SAFETY PROCEDURES AND PROPER HANDLING OF TOOLS AND TEST EQUIPMENTS ON CELLPHONE REPAIR
Safety procedure and proper handling of tool is highly observed when working any electronic components to avoid risk of unnecessary further damages whatever you are working at. These are the following thing that always to remind when working any electronic components such as cellphones.
Antistatic Wrist Strap
Wear a Ground Strap.
Anti static wrist strap is used to avoid risk of electrostatic discharge from a human body to an electronic component circuit.
An antistatic wrist strap, ESD wrist strap, or ground bracelet is an antistatic device used to prevent electrostatic discharge (ESD) by safely grounding a person working on electronic equipment.

It consists of a stretchy band of fabric with fine conductive fibers woven into it. The fibers are usually made of carbon or carbon-filled rubber, and the strap is bound with a stainless steel clasp or plate. They are usually used in conjunction with an antistatic mat on the workbench, or a special static-dissipating plastic laminate on the workbench surface.
Hand Gloves
You are not just protecting your hand from posibble burns or brushes. it also protect the cellphones from scratches and possible electrostatic discharge. A cotton cloth made glove is essential to use.

Safety Handling with Rework and Soldering Stations
Rework and soldering Station is a hot surface devices and can cause fire instanly and extreme burns on skin when unproperly handled.
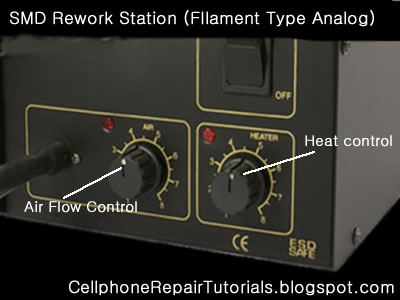
Always Observe and Set it in proper heat and air flow amounts.
Secure a safe place on your table where the rework station is located. Avoid inplacing it that people may pass or standing by especially kids.

Always shut it off when not in use and place unto the holder stand to avoid risk of fire and skin burns.
Safety Handling of a Multitester
a multitester may damaged easily when unproperly handled. always check ranges when checking voltages and currents. The deplection yoke of the analog meter may be bust out when overdrive by a current to it.
Measuring Resistance
Set the multimeter to Ohms or Resistance (turn meter on if it has a separate power switch). Understand that resistance and continuity are opposites. The multimeter measures resistance in ohms, it can not measure continuity. When there is little resistance there is a great deal of continuity. Conversely, when there is a great deal of resistance, there is little continuity. With this in mind, when we measure resistance we can make assumptions about continuity based on the resistance values measured. Observe the meter indication. If the test leads are not in contact with anything, the needle or pointer of an analog meter will be resting at the left most position. This is represents an infinite amount of resistance, or an "open circuit"; it is also safe to say there is the no continuity, or path between the black and redprobes. Careful inspection of the dial should reveal the OHM scale. It is usually the top-most scale and has values that are highest on the left of the dial (a sideways "8" for infinity) and gradually reduce to 0 on the right. This is opposite of the other scales; they have the lowest values on the left and increase going right.
Mesuring Voltage Ac-DC
Set the meter for the highest range provided for AC or DC Volts. Many times, the voltage to be measured has a value that is unknown. For this reason, the highest range possible is selected so that the meter circuitry and movement will not be damaged by voltage greater than expected.
Measuring Current by Ampere
Set the meter to the highest AC or DC Amp range supported. If the circuit to be tested is AC but the meter will only measure DC amps (or vice-versa), stop. The meter must be able to measure the same mode (AC or DC) Amps as the voltage in the circuit, otherwise it will indicate 0.
Be aware that most multimeters will only measure extremely small amounts of current, in the uA and mA ranges. 1 uA is .000001 amp and 1 mA is .001 amp. These are values of current that flow only in the most delicate electronic circuits, and are literally thousands (and even millions) of times smaller than values seen in the home and automotive circuits that most homeowners would be interested testing. Just for reference, a typical 100W / 120V light bulb will draw .833 Amps. This amount of current would likely damage the meter beyond repair. A "clamp-on" type ammeter would be ideal for the typical homeowner requirements, and does not require opening the circuit to take measurements (see below). If this meter were to be used to measure current through a 4700 ohm resistor across 9 Volts DC, it would be done as outlined below:
Safety Handling of a Power Supply
Power supply may also damaged and cause damaged to a component..
Always set it and determine the correct amount of Voltage range to avoid risk of blowing out any electronic parts.

Do not short the two alligator clips because the power supply will heat up and may busted out the protection fuse.
Antistatic Wrist Strap
Wear a Ground Strap.
Anti static wrist strap is used to avoid risk of electrostatic discharge from a human body to an electronic component circuit.
An antistatic wrist strap, ESD wrist strap, or ground bracelet is an antistatic device used to prevent electrostatic discharge (ESD) by safely grounding a person working on electronic equipment.
It consists of a stretchy band of fabric with fine conductive fibers woven into it. The fibers are usually made of carbon or carbon-filled rubber, and the strap is bound with a stainless steel clasp or plate. They are usually used in conjunction with an antistatic mat on the workbench, or a special static-dissipating plastic laminate on the workbench surface.
Hand Gloves
You are not just protecting your hand from posibble burns or brushes. it also protect the cellphones from scratches and possible electrostatic discharge. A cotton cloth made glove is essential to use.
Safety Handling with Rework and Soldering Stations
Rework and soldering Station is a hot surface devices and can cause fire instanly and extreme burns on skin when unproperly handled.
Always Observe and Set it in proper heat and air flow amounts.
Secure a safe place on your table where the rework station is located. Avoid inplacing it that people may pass or standing by especially kids.
Always shut it off when not in use and place unto the holder stand to avoid risk of fire and skin burns.
Safety Handling of a Multitester
a multitester may damaged easily when unproperly handled. always check ranges when checking voltages and currents. The deplection yoke of the analog meter may be bust out when overdrive by a current to it.
Measuring Resistance
Set the multimeter to Ohms or Resistance (turn meter on if it has a separate power switch). Understand that resistance and continuity are opposites. The multimeter measures resistance in ohms, it can not measure continuity. When there is little resistance there is a great deal of continuity. Conversely, when there is a great deal of resistance, there is little continuity. With this in mind, when we measure resistance we can make assumptions about continuity based on the resistance values measured. Observe the meter indication. If the test leads are not in contact with anything, the needle or pointer of an analog meter will be resting at the left most position. This is represents an infinite amount of resistance, or an "open circuit"; it is also safe to say there is the no continuity, or path between the black and redprobes. Careful inspection of the dial should reveal the OHM scale. It is usually the top-most scale and has values that are highest on the left of the dial (a sideways "8" for infinity) and gradually reduce to 0 on the right. This is opposite of the other scales; they have the lowest values on the left and increase going right.
Mesuring Voltage Ac-DC
Set the meter for the highest range provided for AC or DC Volts. Many times, the voltage to be measured has a value that is unknown. For this reason, the highest range possible is selected so that the meter circuitry and movement will not be damaged by voltage greater than expected.
Measuring Current by Ampere
Set the meter to the highest AC or DC Amp range supported. If the circuit to be tested is AC but the meter will only measure DC amps (or vice-versa), stop. The meter must be able to measure the same mode (AC or DC) Amps as the voltage in the circuit, otherwise it will indicate 0.
Be aware that most multimeters will only measure extremely small amounts of current, in the uA and mA ranges. 1 uA is .000001 amp and 1 mA is .001 amp. These are values of current that flow only in the most delicate electronic circuits, and are literally thousands (and even millions) of times smaller than values seen in the home and automotive circuits that most homeowners would be interested testing. Just for reference, a typical 100W / 120V light bulb will draw .833 Amps. This amount of current would likely damage the meter beyond repair. A "clamp-on" type ammeter would be ideal for the typical homeowner requirements, and does not require opening the circuit to take measurements (see below). If this meter were to be used to measure current through a 4700 ohm resistor across 9 Volts DC, it would be done as outlined below:
Safety Handling of a Power Supply
Power supply may also damaged and cause damaged to a component..
Always set it and determine the correct amount of Voltage range to avoid risk of blowing out any electronic parts.
Do not short the two alligator clips because the power supply will heat up and may busted out the protection fuse.


No comments:
Post a Comment